We may earn revenue from the products available on this page and participate in affiliate programs.
We assume a lot about furniture: Sofas belong in the living room, console tables in the entryway—you get the gist. Some of our favorite projects, however, are ones that throw out that rule book. Take a staple piece like a dresser. The bedroom is the most obvious place to put it, but ask pro renovators Claudia and Chris Beiler and they’ll point you in the direction of the bathroom.
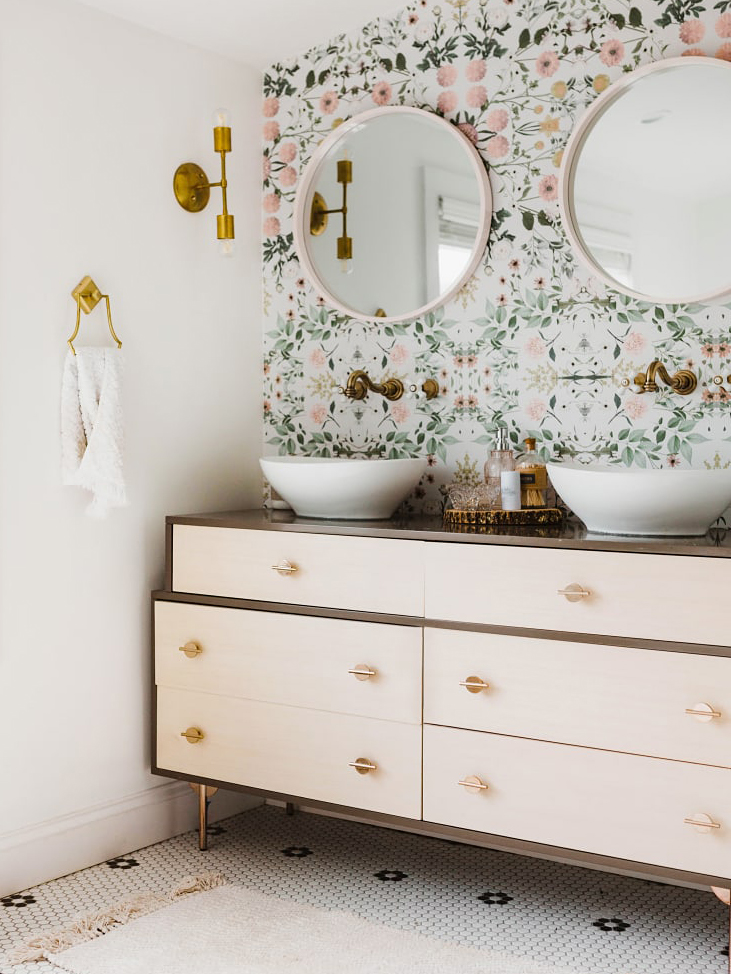
When the couple transformed an 1800s fixer-upper for a young couple living in Lancaster, Pennsylvania, they customized every detail down to the double-sink vanity, which, in a former life, was West Elm’s Modernist chest. Claudia scored the six-drawer storage unit on sale for $300, then the couple converted it into a bathroom fixture for another $700 (for one day’s worth of labor, the sinks, and plumbing fixtures). “The final cost is around the same as a ready-made vanity, but you’re left with this brilliant one-of-a-kind piece,” says Chris. Below, six things to know before you DIY, plus five other hacks that’ll get you thinking outside the box.
Materials Matter
The best dressers for this are ones that are water resistant and have enough counter space for basins. You don’t even have to start with a brand-new piece of furniture—actor Sophia Bush used a vintage sideboard in her former Chicago bathroom. Try looking for something with a veneer or laminate surface rather than real wood; it will hold up better to moisture and last longer. “Laminate can pull away from its backing if it gets cracked, so we look for laminated tops that don’t have splices around the edges,” Chris points out.
The Deeper the Drawers, the Better

Chris suggests cutting the bottoms of the drawers partially and removing the backs so that when they’re fully closed, they end before the drain hole that you’ll cut in the top. “Usually this means these top drawers are only a few inches deep,” he explains—so furniture with already-shallow drawers will make the reconfiguring process a lot more time-consuming.
If you’re installing a single vessel sink, choose a dresser with only one drawer in the front. For a double vanity, he suggests getting a piece with two: “This will ensure you don’t need to plumb the drain hole right where the sliders are.”
Elevate the Sink (But Not Too Much!)
A vessel basin (one that sits on top of the counter rather than flush with it) won’t interfere with the drawer hardware, making the install a lot easier. “We have found that it’s best to go with fairly shallow bowls,” says Chris. A good rule of thumb: The final measurement from the floor to the rim of the sink should be around 36 inches.
Few Cuts Are Actually Required
If you’re slicing through a laminate surface, you can get away with using a standard wood hole saw. (If the top is marble or quartz, Chris says you may need a carbide bit.) To figure out where you’ll need to cut through the top, set your sinks down on the dresser exactly where you want them. Mark the drain hole location with a pencil and saw accordingly.
Go for Wall-Mounted Faucets
For the West Elm vanity hack, the Beilers used a ceramic art basin from Amazon, but instead of installing the corresponding faucet on the counter, the pair opted for different brass fixtures and mounted them to the wall. There’s some extra patching required, but it will streamline the overall look and offer more room to spread out.
Keep a Protective Coating on Standby
If you do decide to go with a piece made head to toe from real wood, cover the surface with a standard wood sealer from your local hardware store to protect it from wear and tear. Consider your bases covered.
Now that you have the know-how, get inspired by these five other dressers–turned–bathroom vanities.
The One That Was Only $100

After finding a cheap antique dresser that was the exact same height as her current sink, Charlotte Smith (of the blog At Charlotte’s House) sanded it down and applied a bleach to lighten the grain for a more rustic, less colonial look. Her secret weapon for the $100-in-total DIY? Combining Master’s Armour sealant with an added hardener by the same brand.
The Traditional Drop-In Sink One

Colorado-based photographer Sarah Lawrence had originally envisioned two pieces of floating wood for her bathroom vanity, but it was going to cost her around $1,800 for the labor and materials. In nearby Denver, she discovered a $800 table. Her contractor dropped a $380 sink from All Modern in the center and…voilà! They kept it simple by not fussing with the drawers or the finish of the furniture.
The Double One Made for Zen

Christina Valencia and Kele Dobrinski, the wife-and-husband designers behind local firm Colossus Mfg., went with a hotel suite vibe in this California home by creating an open-concept shower-vanity-bedroom area. The reimagined chest is now topped with tile from Tile Bar and hardware from the Delta Trinsic line.
The Italian-Inspired One

Photographer Thayer Gowdy’s vintage Gabriella Crespi pencil reed dresser (a Chairish score) now lives in her Ojai, California, bathroom. The terrazzo countertop was a scrap piece left over from the rest of the bathroom reno, and she went through three different sinks before she found ones that were light enough.
The One That Spared the Budget

Artist Christine Flynn spent a cool $24,000 on labor, plumbing, and fixtures for her bathroom remodel. It was going to cost even more until she and her husband got scrappy and found an old cabinet, bought black hex tile on sale, and used leftover paint from their bedroom renovation (Benjamin Moore’s Pinky Swear) to give the walls the same soft whisper of color.

